Propagator Presets
The propagator operation is always run from the configuration defined in a preset.
To access the Propagator Preset manager, click the
CONFIGURATION  button at the top left and select
Data Propagator.
button at the top left and select
Data Propagator.
The panel on the left shows a list of the stored presets. Click over a preset name to display the content of the preset.
You can use the search box Type to search presets... below the top menu to enter a string to match for any sequence of letters that is contained in preset names. Click the X button to restore the list to all presets.
Preset editor
Operations on presets are accessed in the top menu:
- +New: Create a new preset; type a name into the Add New Preset dialog.
- Save: Save changes to the currently-opened preset (disabled if there are no unsaved changes).
- Rename: Rename the selected preset.
- Delete: Delete the selected preset.
- Import: Import a preset from a local '.preset' file; a preset of the same name cannot already exist.
- Export: Export the selected preset data to a local '.preset' file.
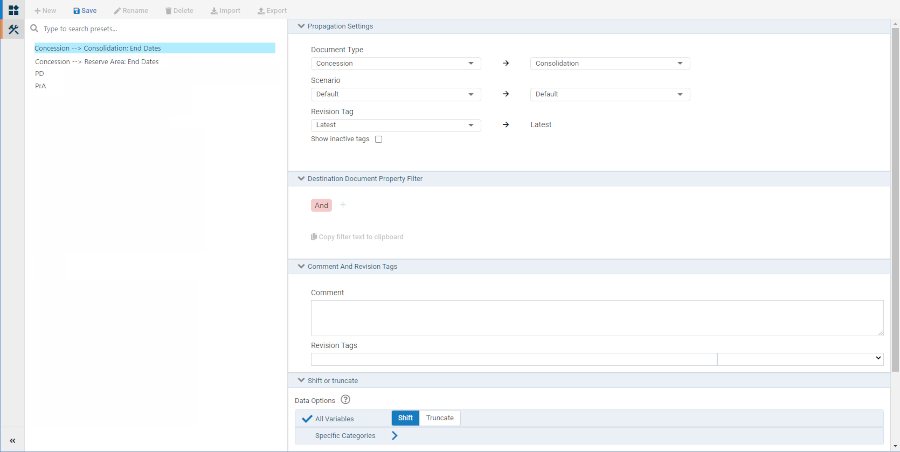
Propagation Settings
Document Type: Select the 'Source Document Type', and the 'Destination Document Type'.
Scenario: You can select one scenario for source documents, and one different scenario for destination documents. Or, select more than one source scenario and those data will be propagated into the corresponding scenarios in the destination documents. Or, select 'All scenarios' for the source and all scenarios will be will be propagated into the corresponding scenarios in the destination documents.
Revision Tag: Set a Revision Tag for the source documents ('Latest' is default).
Destination Document Property Filter
You can set up logical conditions, based on the values of document properties, to create a filter which will select a sub-set of destination documents from the version hierarchy.
The Is blank and Is not blank conditions can be used to filter based on properties that are null-valued or not null-valued.
Comment and Revision Tags
The Comment and Revision Tags fields can be used to set default content for the revision history during a data propagation. These can be edited in the New Revision Details dialog when the preset is being used.
Document Matching
'Basic' and 'Advanced' options are available. In either case the matching process will be restricted to the part of the hierarchy that is below the node where the Data Propagator tool is opened.
Basic Matching: Source documents are only matched with target documents that are desecendants (child nodes) of each source document.
Advanced Matching: Source and target documents are matched based on the source and target variables specified in the settings Source Variable and Target Variable. Target documents are not restricted to being descendants (child nodes) of source documents, i.e. the matching is applied 'cross-hierarchy'.
Shift or Truncate
This setting determines what happens when periodic data is inserted into a document with a different start date to the source document.
The default behavior is Shift for all variables, that is, data will be shifted to align with a different document start date. Alternatively, use Truncate so that data will not be time-shifted and any data lying outside a different date range will be truncated.
If you want to specify differerent behavior for specific categories of variables then use the Specific Categories controls.
Variable Settings
When you have set the source and destination document types for a new preset, a list of variables that are common for the two document types will be inserted into the Variable Settings field.
The list can be ordered in different ways by clicking the column headers, and the list can be filtered by using the filter button in one or more of the column headers.
Use the check boxes in the first column to select the variable mappings that will be used for propagation.
If you want to change the mapping of a source (or destination) variable, click in the destination (or source) cell and select a different variable. Variables must be compatible for unit type; if not, this is indicated by a red outline to the cells.
You can also set up mappings manually, using the top row of the list: click in the cells 'Add a variable to propagate from' and 'Add a variable to propagate to'.
A mapping can be deleted by hovering the mouse over it, then clicking the red x button which appears in the 'Action' column.